
Hello my lovely DIY enthusiasts, Ava here!
There’s something incredibly satisfying about whipping up your own beauty treatments, isn’t there? Knowing exactly what’s going onto your skin, using simple, natural ingredients that you might even have in your kitchen right now – it’s empowering, fun, and often surprisingly effective! Plus, it’s a wonderful way to treat yourself to a little pampering session without breaking the bank.
While I adore beautifully formulated skincare products, I also have a soft spot for time-tested, gentle DIY recipes that nature provides. Today, I want to share one of my all-time favorites, a truly blissful 3-ingredient mask that leaves my skin feeling soft, soothed, and wonderfully glowy: my Honey & Oat Glow Mask.
This mask is a gentle giant – it’s incredibly nourishing and calming, making it suitable for most skin types, even sensitive ones (though always do a patch test first, my dears!). It’s my go-to when my skin needs a little extra TLC, a pick-me-up after a long week, or when I just want to indulge in a simple act of self-care.
Ready to unlock a little pot of homemade happiness for your skin? Let’s get mixing!
The Magic Behind the Ingredients
What makes these three simple ingredients so powerful together?
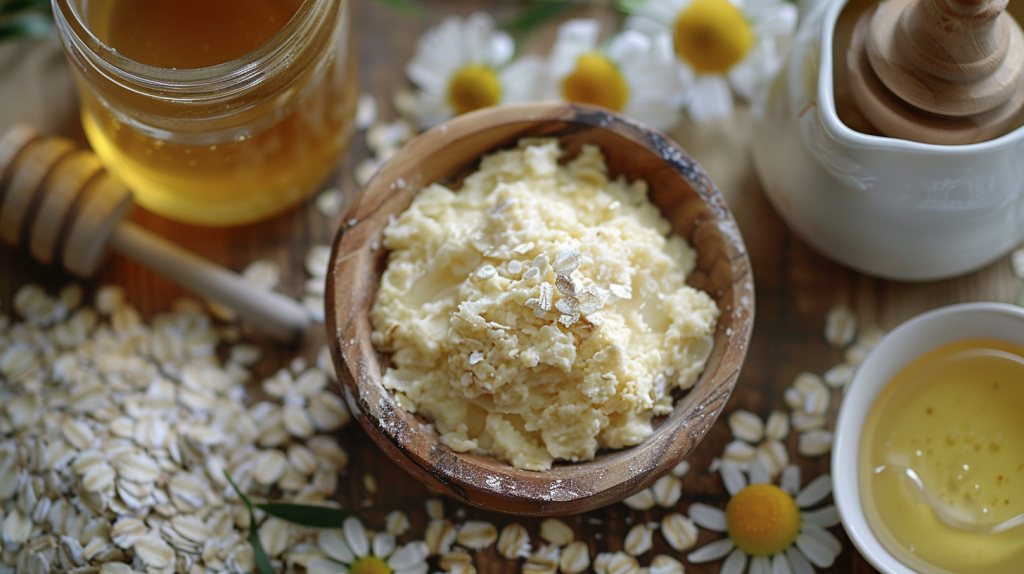
- Raw Honey: A true gift from nature! Raw honey (unpasteurized is best) is a natural humectant, meaning it draws moisture into the skin, keeping it hydrated and plump. It’s also packed with antibacterial and anti-inflammatory properties, which can help soothe irritated skin, calm breakouts, and promote healing. Plus, it’s loaded with antioxidants to fight free radical damage.
- Oats (Rolled or Colloidal): Think of oats as a comforting hug for your skin. They are incredibly soothing and calming, known for their ability to relieve itching and irritation (hello, eczema and rosacea sufferers!). Oats contain saponins, which are natural cleansers, helping to gently remove dirt and oil from pores. They also have moisturizing and protective qualities. Finely ground rolled oats or colloidal oatmeal (specifically made for skincare) work best.
- Plain Yogurt (Optional, but lovely!): While the honey and oats are the core stars, adding a touch of plain, unsweetened yogurt (full-fat is great) can elevate this mask further. Yogurt contains lactic acid, a gentle alpha-hydroxy acid (AHA) that helps to exfoliate dead skin cells, revealing brighter, smoother skin. It’s also cooling and can help to refine pores. If you’re dairy-sensitive or vegan, you can omit this or substitute with a little floral water like rosewater, or even just a splash of lukewarm water to get the right consistency.
Ava’s 3-Ingredient Honey & Oat Glow Mask Recipe
This recipe is beautifully simple and can be easily adjusted.
What You’ll Need:
- 1 Tablespoon Raw Honey
- 1 Tablespoon Finely Ground Oats (you can grind rolled oats in a clean coffee grinder or food processor) or Colloidal Oatmeal
- 1 Teaspoon Plain, Unsweetened Yogurt (Optional)
- A small, clean bowl and a spoon or spatula for mixing
The Ritual of Creation & Application:
- Prepare Your Oats: If you’re using rolled oats, grind them into a fine powder. You want a soft texture, not coarse bits that could be too abrasive.
- Combine Ingredients: In your clean bowl, combine the raw honey and ground oats. If using, add the plain yogurt.
- Mix to Perfection: Stir the ingredients together until you achieve a smooth, spreadable paste. If it’s too thick, add a tiny bit more yogurt or a few drops of lukewarm water. If it’s too runny, add a little more ground oats. You’re aiming for a consistency that will stay on your face without dripping too much.

- Cleanse Your Canvas: Start with a clean, dry face. Gently remove any makeup and impurities.
- Apply Your Bliss: Using clean fingers or a mask brush, apply a generous layer of the Honey & Oat Glow Mask all over your face, avoiding the delicate eye area. You can also extend it down to your neck and décolletage if you wish!
- Relax & Rejuvenate: Now for the best part! Find a comfortable spot, lie back, and let the mask work its magic for about 15-20 minutes. This is a perfect time to listen to calming music, meditate, or simply rest your eyes. You might feel a gentle, comforting sensation.
- Rinse & Reveal: After 15-20 minutes, gently rinse the mask off with lukewarm water. You can use soft, circular motions with your fingertips as you rinse to provide a very gentle extra exfoliation. Pat your skin dry with a clean, soft towel.

- Follow Up: Admire your soft, glowing skin! Follow up with your favorite serum and moisturizer to lock in the goodness.
Ava’s Touch: Sometimes, if my skin is feeling particularly dry, I’ll add a tiny drop (literally, one drop!) of a nourishing facial oil like jojoba or rosehip seed oil to the mask mixture for an extra hydration boost. And don’t forget to lick the honey spoon – a little treat for you too!
Tips for Your DIY Masking Experience
- Patch Test First: Always, always do a patch test on a small, inconspicuous area of your skin (like behind your ear or on your inner arm) 24 hours before applying any new DIY treatment to your entire face, especially if you have sensitive skin.
- Use Fresh Ingredients: For the best results and to avoid any potential irritation, use fresh, good-quality ingredients.
- Listen to Your Skin: If you feel any discomfort or stinging (beyond a very mild tingle which can sometimes happen with honey or yogurt for some), rinse the mask off immediately.
- Frequency: You can enjoy this gentle mask 1-2 times a week, or whenever your skin needs a soothing pick-me-up.
- Storage (Not Recommended): It’s best to make this mask fresh each time you use it, as it doesn’t contain preservatives. If you happen to make a little extra, you might be able to store it in an airtight container in the refrigerator for a day, but fresh is always optimal.
Embrace the Simple Joy of DIY Beauty
There you have it – my favorite, super simple, and incredibly effective Honey & Oat Glow Mask! It’s a beautiful reminder that sometimes the most powerful beauty solutions are found in nature’s pantry.
I encourage you to try it and experience the blissful results for yourself. Making time for these little acts of self-care can make such a difference not just to your skin, but to your overall sense of well-being.
Do you have any favorite DIY beauty recipes? I’d absolutely love to hear them! Share your secrets in the comments below!
Here’s to happy, healthy, glowing skin, made with love!
Ava Sinclair